Instructions and Notes
Instructions and
Notes
table
of Contents
1.) Introduction
2.) Registration
Instructions
3.) Toolbar
4.) Company
Administration
5.) Company
Preferences: Custom Amendment, Condition Text & Custom Language on
Recommendation Forms
6.) User Administration
7.) Logon
8.) Request
List
9.) Startup View
10.) Customizing
the Request List
11.) Sorting the Request List
12.) Entry
and Request for Recommendation
13.) Uploading,
Pasting of Documents and Request Notes
14.) Accepting,
Rejecting, and Editing of Requests by Court Clerks
15.) Accepting Requests
16.) Rejecting Requests
17.) Editing Requests
18.) Recommendations
19.) Templates
20.) Quick Rec
1.) Introduction
LawSourceLive was developed to provide a secure, reliable,
and convenient method for exchanging information between courts and attorneys.
Effective communication is the key to keeping a municipal, or any court docket
moving. LawSourceLive allows attorneys to enter their appearance, request a
recommendation, and receive a recommendation (possibly within minutes - the
record is 1 minute!). The attorney doesn't even have to leave their office or
mail a letter and the courts minimize the amount of time receiving and sending
paper correspondence. The courts can accept entries and a recommendation can be
sent back to the defense attorney electronically. Documents, such as proof of
insurance, driving records, proof of reinstatement, or police reports can be
attached electronically by all users by uploading them, pasting them, or typing
them with the Upload, Paste, and Note Tab features. Communication between the
courts, the defense bar, and the prosecutor has never been easier. Simply
register your law firm or municipality with LawSourceLive by clicking "Register"
and completing the registration information. Once a registration has been
confirmed, and a law firm user has logged on to the system, the user can click
the "New Request" button  on LawSourceLive
toolbar to submit an entry and request for recommendation. Participating courts
can log on to LawSourceLive and view any entries and requests for
recommendations that have been submitted. The toolbar is only available when a
user is logged on to the system and changes based on what the user is doing and
what role they have been assigned by their respective firm administrator
"FirmAdmin" or municipal administrator "MuniAdmin". To find out what the buttons
on the toolbar do, just hold your mouse over the button and a description is
displayed in the box to the right. For law firms, after clicking the "New
Request" button, choose the municipality where the case is pending from the drop
down list and enter your client’s information. Click "Submit", then confirm the
request, and your entry and request is instantly made available to the court for
acceptance. Once your request has been accepted by the court your entry will be
available for the prosecuting attorney to issue a recommendation. Any user
logged on to the system may view the status of a request by clicking the "View
Requests"
on LawSourceLive
toolbar to submit an entry and request for recommendation. Participating courts
can log on to LawSourceLive and view any entries and requests for
recommendations that have been submitted. The toolbar is only available when a
user is logged on to the system and changes based on what the user is doing and
what role they have been assigned by their respective firm administrator
"FirmAdmin" or municipal administrator "MuniAdmin". To find out what the buttons
on the toolbar do, just hold your mouse over the button and a description is
displayed in the box to the right. For law firms, after clicking the "New
Request" button, choose the municipality where the case is pending from the drop
down list and enter your client’s information. Click "Submit", then confirm the
request, and your entry and request is instantly made available to the court for
acceptance. Once your request has been accepted by the court your entry will be
available for the prosecuting attorney to issue a recommendation. Any user
logged on to the system may view the status of a request by clicking the "View
Requests"  button on LawSourceLive toolbar. Any
time the status is updated on a request a user will receive an e-mail
notification.
button on LawSourceLive toolbar. Any
time the status is updated on a request a user will receive an e-mail
notification.
2.) Registration Instructions [Back to table of Contents}
1) All
new users of the system with the authority to register the law firm or
municipality must register and set up a secure logon ID and password for each
user of the law firm or the municipality.
2) This is
accomplished by logging on to the internet and accessing LawSourceLive home site
at www.LawSourceLive.com.
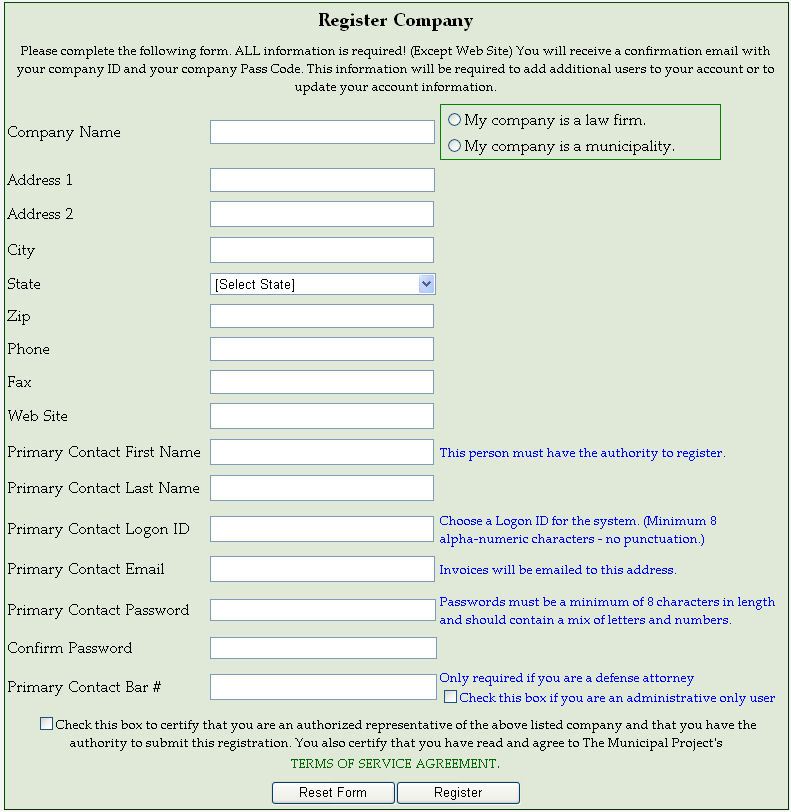
3) You
will see the following page:

Click the "Register" button and you will see the
following form:
3.) Toolbar [Back to table of
Contents}
The
toolbar is a dynamic control that changes depending on what role the current
user is in and what functions are being performed at that time.

Toolbar Legend
| "New Request" button. This button is only available if the currently logged on user works for a law firm and is in the "Defender" role. | |
| "View Requests" button. This button is available to all users of the site. Clicking on this button brings up a list of the current requests for your company. This is the same list that is presented when first logging on to the site. | |
| "Upload Document" button. This button allows for the "attaching" of documents to a request and is available to all users of the site. | |
| "Paste Document" button. This button allows for the "pasting" of documents to be attached to a request and is available to all users of the site. This page can also be used as a basic word processor for creating adhoc documents. | |
| "User Admin" button. This button allows for the management of site users and is only available if the currently logged on user is in an administrative role for the site. These roles include "MuniAdmin", "FirmAdmin", and "Administrator". | |
| "Company Admin" button. This button allows for the management of company specific information and is only available if the currently logged on user is in an administrative role for the site. The roles include "MuniAdmin", "FirmAdmin", and "Administrator". | |
| "Print" button. The print button will appear on the toolbar if the current document being viewed has a "printer friendly" version available. This print method gives a clean copy of the document without the added Web page information being printed. | |
| "Admin" button. This button is only available to the site administrator. | |
| "Hide from list" button. This button is visible when viewing a document pertaining to a request that has reached a final resolution such as a recommendation being issued or the request being rejected by the court. Clicking on this button will "hide" the request from the "Request List" and change the button to the "Show in list" button as seen below. | |
| "Show in list" button. This button is visible when viewing a document pertaining to a request that has been "Hidden". Clicking this button will "unhide" the request and the "Hide from list" button will appear as shown above. | |
| "Search" button. This button is viewable by all users and gives the ability to search for a particular defendant/client/transaction by entering particular search data such as the Request ID, Defendant Last Name, Defendant First Name, License #, Case #, or Ticket #. This will locate the requested information even if the case is "Hidden". | |
| "Previous Case" and "Next Case" buttons. These buttons provide the user the ability to sequentially move to the previous or next case in the current "Request List". This eliminates the need to return to the "Request List" to select the next case to perform an action on. Browsing the "Request List" is circular so that when you reach the end of the list it will start browsing from the beginning. When using the search function mentioned above using the Previous and Next Case buttons will browse the results of the search. |
 . This will display
the following form.
. This will display
the following form.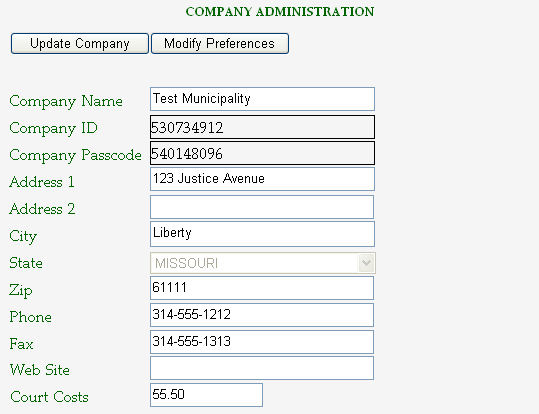
5.) Company Preferences: Custom Amendment, Condition Text & Custom Language on Recommendation Forms [Back to table of Contents}
1)
Amendments and conditions can be added to the Recommendation form by typing in
the selected data and saving those selections.
2)
Amendments and Conditions that are standard for a municipality/prosecutor can
also be added in the Company Administration section by a user assigned the
"MuniAdmin" role for the municipality. By clicking on the Company Preferences
button, the following screen appears. These amendments and conditions will then
be available in the drop down lists on the Recommendation form for all
prosecutors assigned to that municipality. Each prosecutor will still be able to
save their own amendments and conditions by clicking on the save/update button
on the Recommendation form as described and shown in the Recommendations section
shown below.
3) Custom language to appear on the
Appearance and Payment recommendations can be entered in the "Company
Preferences" section. By entering the desired text in the text boxes (see sample
below) for those recommendations requiring an appearance and those requiring
payment, the text will appear at the bottom of the completed recommendations.
Note: All users must remember
to click the "Save Preferences" button after making any modifications to this
page.

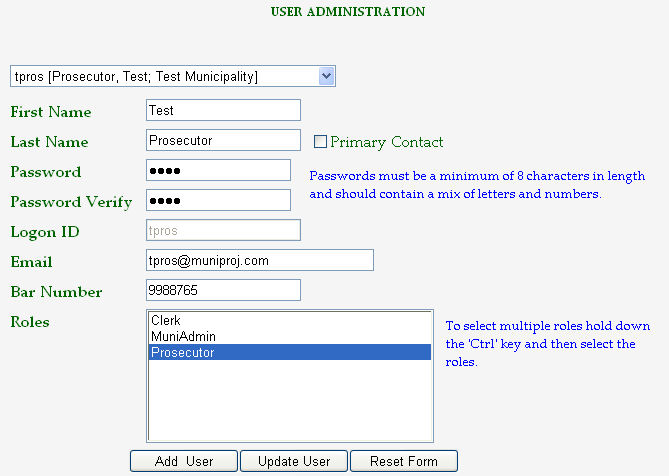
6.) User Administration [Back to table of Contents}
1)
User Administration can be accessed by the users at both municipalities and law
firms who are in the "MuniAdmin" and "FirmAdmin" roles. This is done by clicking
on the following toolbar button  . This will display the
following screen.
. This will display the
following screen.
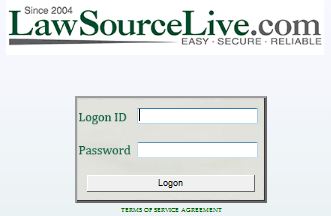
7.) Logon [Back to table of Contents}
1)
After registration, and users have been assigned their Logon ID and passwords,
users can access the site by browsing to www.LawSourceLive.com and clicking the "Logon"
button.
2) Users will then see a logon screen requesting
Logon ID and Password.
 on the toolbar.
8.) Request List [Back to table of Contents}
After
the user has successfully authenticated, LawSourceLive opens
automatically to a "Request List" page similar to that shown below.
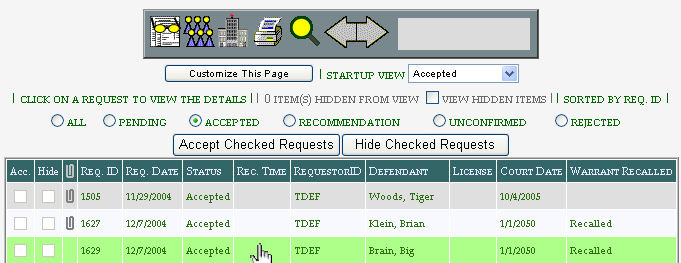
9.) Startup View [Back to table of Contents}
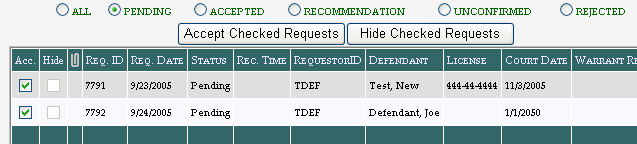
The "Startup View" selection allows the user to have the initial "Request List" upon logon start with those cases in a particular status. (i.e. All, Pending, Accepted, Rejected, Recommendation, or Unconfirmed). The majority of Users will use All or Pending. The "Startup View" can be changed using the drop down selection as shown below.

Note: The startup view should be used
carefully since it may hide new items depending on how the view
is set.
Clicking on the filter
selections above the "Request List" allows the current view to be changed
regardless of the startup view and remains in place until changed again
or logging off from the site.
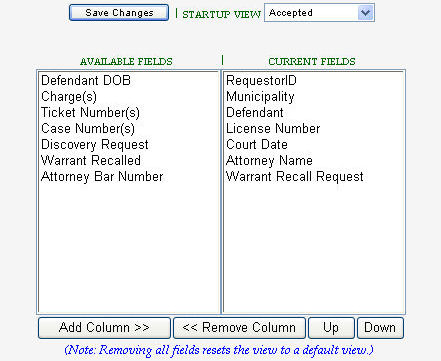
10.) Customizing the Request List [Back to table of
Contents}
The
"Request List" can be Customized by each user by clicking on the "Customize This
Page" button.
On the customization page, the user can
select the items they want to appear on their personal "Request List". There is
a list of "Available Fields" and "Current Fields". The "Current Fields" are
those that are currently being viewed on the "Request List" and the "Available
Fields" are those that can be inserted if desired by the user. The user selects
the item by clicking on it with their mouse and then adds or removes it
from or to the "Available Fields" or "Current Fields" columns by clicking on the
appropriate button. It can also be moved within the "Request List" left or right
by moving it within the column by selecting it and moving it up or down. Items
higher in the column will come first in the list. Some of the fields on the
"Request List" are required and cannot be moved or removed by the user. All
users must click "Save Changes" after customizing their "Request List" for the
changes to take effect.
11.) Sorting the Request List [Back to table of Contents}
By
clicking on the column title the "Request List" can be sorted in a particular
order. If the user wants to view Defendants alphabetically, they can do so by
clicking on Defendant, or grouped by Court Date (alphabetically within a court
date) by clicking on Court Date. If the "Request List" gets too long, items can
be "Hidden" from view. This allows the "Request List" to load faster and
"Hidden" items can be viewed by clicking on View "Hidden" Items or by Searching
for an item. Even if "Hidden", the system will find that item when using the
search feature. Items on the "Request List" can be "Hidden" from view by
clicking on the "Hide" check box next to the item they wish to hide. An entire
group of items can be "Hidden" at once by selecting the items by clicking the
"Hide" check box next to the item and then clicking on the "Hide Checked
Requests" button on the "Request List" page. Items can only be "Hidden" if they
have a status of "Recommendation" or "Rejected". If they are "Pending" or
"Accepted" they cannot be "Hidden".

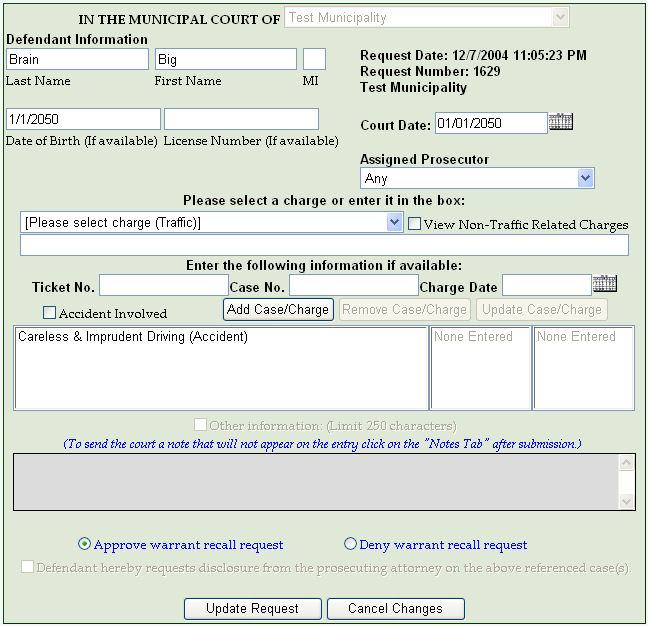
12.) Entry and Request for Recommendation [Back to table of Contents}
1) Law
Firms initiate a transaction by clicking on the "New Request" button on the toolbar after logging on to
the system. They will then see the below form.

2) As
much information as is available should be included on the form so the courts
can readily identify the correct defendant and case that is being entered on. If
an accident is involved, then the accident check box should be checked. If
disclosure is requested or a warrant recall is requested those boxes should be
checked as well. These items will then be printed on the entry and request upon
submission.
3) The court the request is being submitted
to must be selected from the drop down list.
4) Multiple
counts or charges can be inserted in the charges section. The charge can be
selected from either the traffic offenses drop down selection list or by
clicking on the non-traffic related charges check box and the list will
display non-traffic related charges. If the charge you are looking for is
not in the drop down selection list, you can type the charge in the line below
the drop down selection list. After selecting/typing the charge(s) and entering
the data on each charge (i.e. ticket number, case number, offense date), you
must click the "Add Case/Charge" button after each charge to insert that charge
into the charges section. If you wish to remove a charge from the list, select
it by clicking on it, and then click the "Remove Case/Charge" button. If after
entering a charge you wish to modify or change the data entered, select the
charge by clicking on it, and the data fields above the charges list will
be repopulated. You can then make the changes in those data fields, click the
"Update Case/Charge" button, and it will update that charge with the
changes in the charges list.
5) Additional
information can be added to the Request by clicking the "Other Information"
check box, and then typing the desired text in the text box. Maximum
length is 250 characters. The information typed in this section will
appear on the Entry and Request. If you wish to submit information to the court
or prosecutor that you do not want to appear on the Entry, then use the "Notes
Tab" after submission of the Request. You can also use the "Upload Document" and
"Paste Document" features to submit additional documentation. The "Reset Form"
button will clear the form. The "Submit Request" button must be clicked to
submit the request. After clicking the "Submit Request" button, the Entry and
Request for Recommendation form that will be submitted to the court is
displayed as shown below.
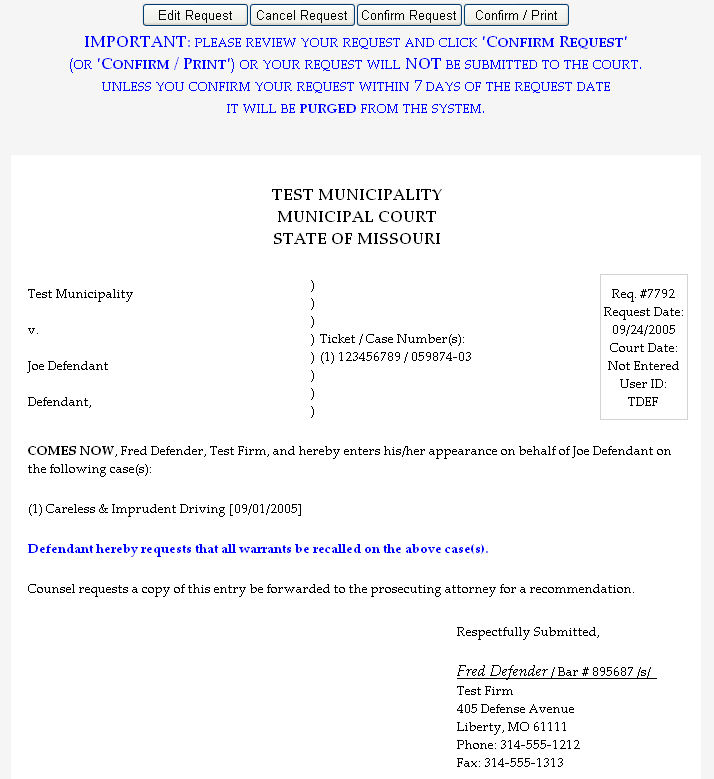
The
Entry can be Edited, Canceled, Confirmed, or Confirmed and Printed. It is at
this point that it must be Confirmed before it is actually submitted. You can
click "Confirm" or "Confirm/Print" if a hard copy is to be made a part of your
file. After the Request is Submitted and Confirmed the "Upload Document" button
 and "Paste Document" button
  are available on the Toolbar when viewing
the Request. These features can be used to send additional documents or text to
the court and prosecutor. The "Upload Document" feature requires the
documents/images to be available electronically as a stored item and then
uploaded from that location. A scanner is useful to scan and save documents to
be submitted to the court in this manner.
are available on the Toolbar when viewing
the Request. These features can be used to send additional documents or text to
the court and prosecutor. The "Upload Document" feature requires the
documents/images to be available electronically as a stored item and then
uploaded from that location. A scanner is useful to scan and save documents to
be submitted to the court in this manner.
13.) Uploading, Pasting of Documents &Request Notes [Back to table of Contents}
The
"Upload Document" button and "Paste Document"
button are available on the Toolbar. The upload
feature allows all users to upload an electronically saved document or image to
be sent and associated with a particular case. See image below. (PLEASE NOTE:
The above buttons only appear after you have opened the Request by clicking on
it in the Request List.)
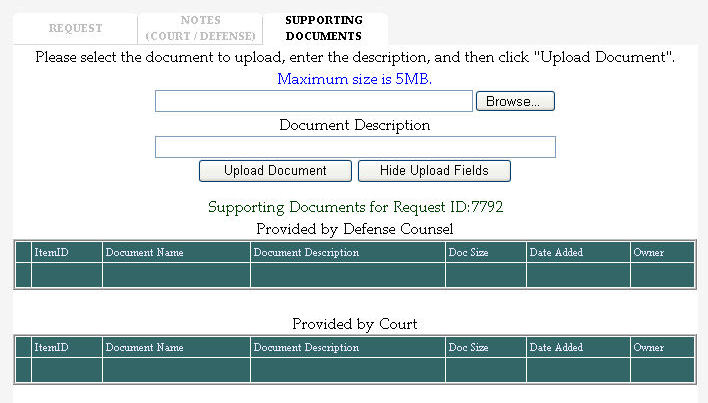
The user enters or browses to the location of the document to be uploaded and then enters a description of the document. A description must be entered. After clicking on the "Upload Document" button, the document is uploaded and becomes part of the "Supporting Documents" on that case. "Supporting documents" on a particular case are distinguished between those submitted by the defense attorney and those submitted by the court/prosecutor. Once a document is submitted, only the user who submitted it can remove it from the system.
The "Paste Document" screen, show below,
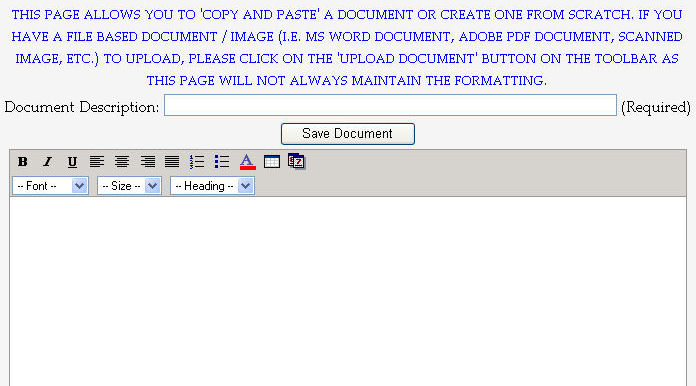
can be used to cut and paste text information from another electronic source for a particular case. A document description must be entered here as well. After pasting the text from another source into the text area, and clicking on the "Save Document" button, the document is saved and becomes part of the "Supporting Documents" on that case. "Supporting Documents" on a particular case are distinguished between those submitted by the defense attorney and those submitted by the court/prosecutor. Once a document is submitted, only the user who submitted it can remove it from the system.
The "Notes (Court Only)" and "Notes (Court/Defense)" tabs, shown below,
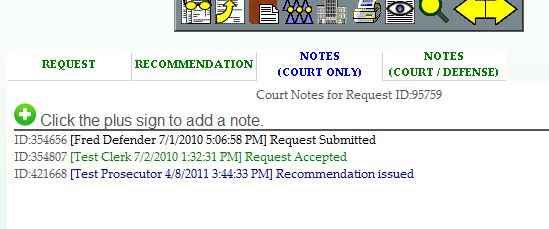
are available as well to type a note that can be viewed in the notes section. The note is typed in the text field and the "Add Note" button is clicked to add the typed text into the notes section. If the note is submitted by the defense attorney it will appear in the "Notes (Court/Defense)" tab. If submitted by the court/prosecutor, it may appear in either the "Notes (Court Only)" or "Notes (Court/Defense)" tab depending on where the user submitting it chooses. The defense attorney is not able to view any notes added into the "Notes (Court Only)" section and will not see that tab in their view of the system. After any of these three methods, upload, paste, or notes, are used to submit documentation, images, or send additional text data, a system generated message (shown below)
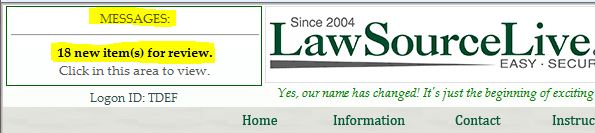
announces the presence of the submitted item. This announcement is present at the top left hand corner of every page in the site and is updated dynamically. After clicking on the message box, the window below is displayed.

The
item can be viewed, viewed and cleared, or cleared. System generated minute
entries in the Notes Tab record when these messages are viewed and cleared.
Clicking on the "View" or "View/Clear" button will bring you to the
corresponding item in the system.
Important Note: Messages generated for a court due to the
actions of a defense attorney generate an alert for ALL court employees.
Clearing one of these alerts also clears it for ALL court employees. A minute
will be generated showing who completed / cleared the
item.
14.) Accepting, Rejecting, and Editing of Requests by Court
Clerks
15.) Accepting Requests [Back to table of
Contents}
Items on the "Request List" can be accepted by the municipalities if they are in Pending status in one of two ways. They can be accepted as a group by checking the accepted check box (Acc.) to the left of the desired items and then clicking on the "Accept Checked Requests" button (see below).
They can also be selected individually by clicking anywhere on the line for a particular defendant in the "Request List" to view that individual entry. When viewing the entry, clicking on the "Accept" or "Accept/Print" button accepts the Request.
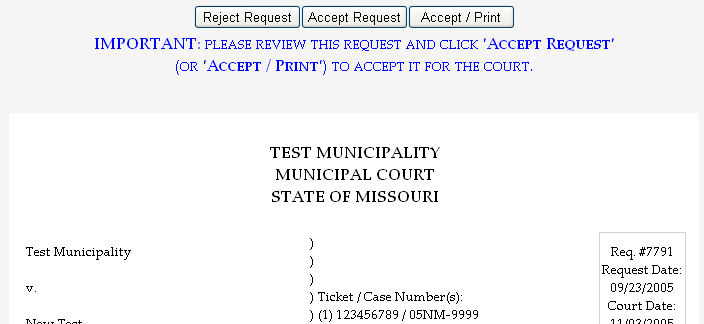
The "Accept/Print" button will display a printer friendly version of the Entry and Request for Recommendation to be printed. This is also where the entry would be rejected by clicking on the "Reject Request" button if the court were to do so for reasons such as the entry being submitted to the wrong court, or if insufficient information was provided for the court to ascertain whether or not that particular case and charge was pending in their court.
16.) Rejecting Requests [Back to table of Contents}
If the court were to reject an entry by clicking the "Reject Request" button, the screen below would appear.
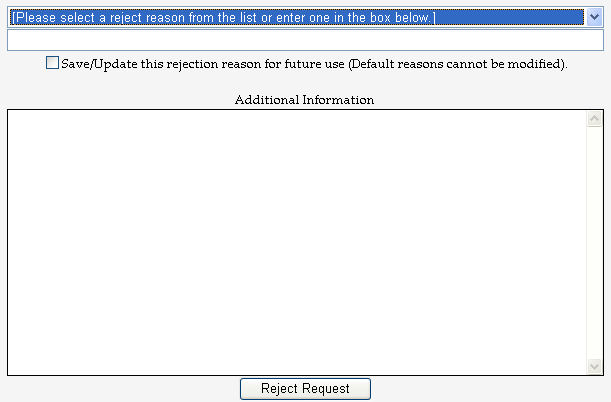
A default reason can be selected or a custom one typed in. If the clerk wants to save the rejection reason for future use the "Save/Update" check box should be selected. This information is then made available to the defense attorney as to why the case was rejected by the court.
17.) Editing Requests [Back to table of Contents}
After a request is accepted, a request can be edited by opening the request and clicking the "Edit Request" button.
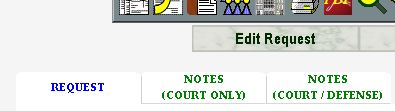
Only a user in the "Clerk" role can edit a request received by the court. When the "Edit Request" button is clicked a form showing the data provided by the law firm is displayed as shown below.
The data can be modified at this time. If the change or edit required deals with multiple counts, or new charges such as failure to appears, they can be inserted in the Charges section. After entering the data on each charge (i.e. ticket number, case number, charge date), you must click the "Add Case/Charge" button to insert that charge into the Charges section. If you wish to remove a charge from the list, select it by clicking on it, and then click the "Remove Case/Charge" button. If after entering a charge you wish to modify or change the data entered, select the charge by clicking it in the charges list, and it will then populate the data fields above the charges list. You can then make the changes in the data fields, click the "Update Case/Charge" button, and it will update that charge with your changes.
Important: The
final step is always to click the "Update Request" button at the bottom of the
page or your changes will not be saved.!
To abandon all changes, and return
the request to its original state before beginning the editing process, click
the "Cancel Changes" button.
18.) Recommendations [Back to table of Contents}
1)
After an entry has been accepted, a user in the "Prosecutor" role can make a
recommendation. When the prosecutor logs on to the system the "Request List"
will show the cases that have been accepted by the court. (A prosecutor can also
have the ability to accept and edit an entry if the "Clerk" role has been
assigned to the prosecutor in the "User Administration" section.)
2) The prosecutor selects the case to be given a
recommendation by clicking anywhere on the line showing the information for that
item in the "Request List".
3) The Entry submitted is
displayed and a "Recommend" button is located at the top of that Entry as shown
below.
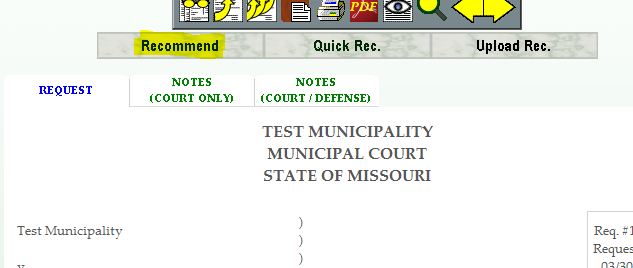
The prosecutor clicks the "Recommend" button and the Recommendation page is displayed as shown below.
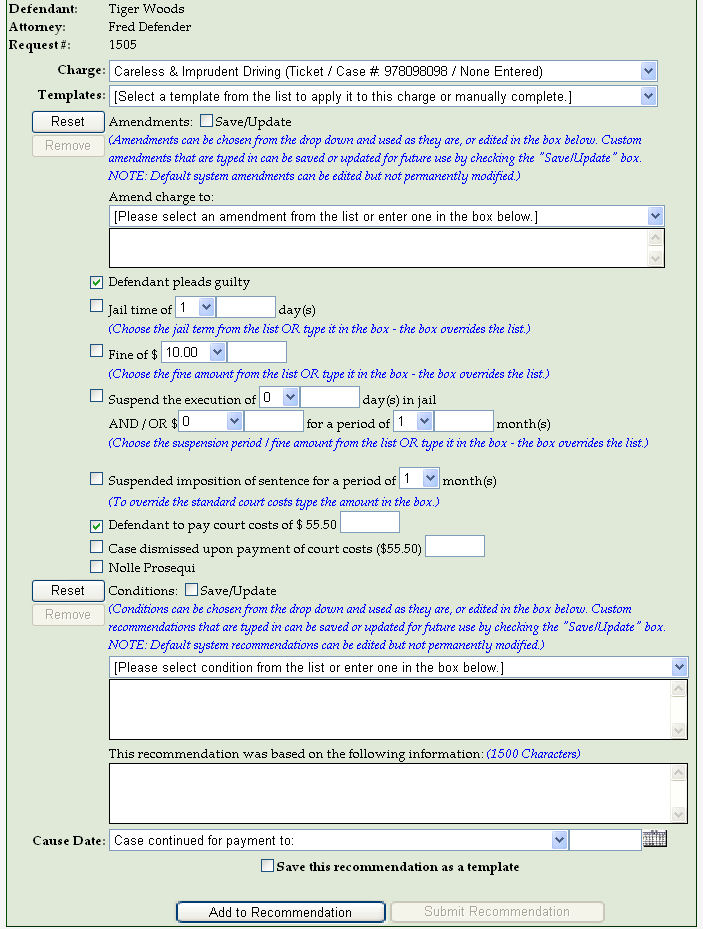
4) The
charges for that Entry are listed in the Charge field. If there are multiple
charges they will be displayed in the drop down list. By clicking the down arrow
the charges can be viewed and selected.
5) The
"Templates" section immediately below the Charges section (this only shows if
templates exist) provides for a standard recommendation to be selected which
will then populate the recommendation form. All that would then be required is
for the "Add to Recommendation" button to be clicked, a Continue for Payment or
Continue for Appearance selection made, a court date assigned, and the "Submit
Recommendation" button to be clicked. A recommendation can be entered by going
through the recommendation form and clicking on the desired sections without
using the template recommendation option. A recommendation entered in this
fashion can be saved as a "Template" recommendation by selecting the "Save
this recommendation as a template" checkbox at the bottom of the form. You would
then be prompted to provide a name/description for the template recommendation
being saved. After clicking the "Add to Recommendation" and "Submit
Recommendation" buttons and assigning an appearance or payment selection, and
assigning a court date, the Recommendation will be displayed (see below).
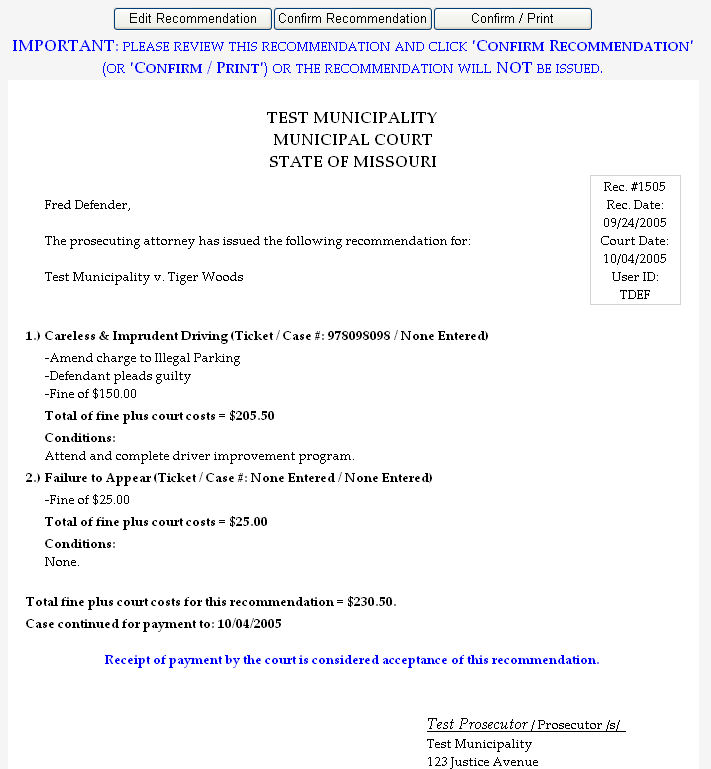
6) This Recommendation must be confirmed before it will be submitted to the defense attorney. An option to edit the Recommendation is available at this time as well. If the Recommendation needs modifying before the prosecutor confirms it, then the "Edit" button will display the Recommendation form again. Any modifications can be made at this time and then the Recommendation can be submitted again for confirmation. The "Confirm/Print" button is also available. Once confirmed, the status changes from "Accepted" to "Recommendation Issued" in the "Request List". The defense attorney is automatically notified of the change in status and may then view/print the recommendation. [Back to table of Contents]
19.) Templates [Back to table of Contents]
Creating
Templates provide a facility to
save standard recommendations so that the same information doesn't have to be
entered multiple times. Templates are created during the process of issuing a
rec using the standard recommendation form. After the form has been completed in
response to a particular charge, the checkbox at the bottom of the form labeled
"Save this recommendation as a template" is selected and you are given the
opportunity to name / describe your template. The template will then be
saved when the "Add to Recommendation" button is clicked. After completing this
process the template will be available to use when responding to like charges in
the future.
Modifying
To modify a template, select
it from the templates dropdown, make any necessary modifications, and then
select the checkbox labeled "Update this template with current
selections". If you want the template you are modifying saved as an
entirely new template also select the checkbox labeled "Save as new" at the
bottom of the recommendation form. You should also provide a new name for the
template at this time. This provides the ability to begin building a
comprehensive list of templates using existing ones as the basis.
Deleting
To delete a
template, select the template from the Templates dropdown and then click the
"Delete" button next to the dropdown as shown below. The template is then
deleted permanently.
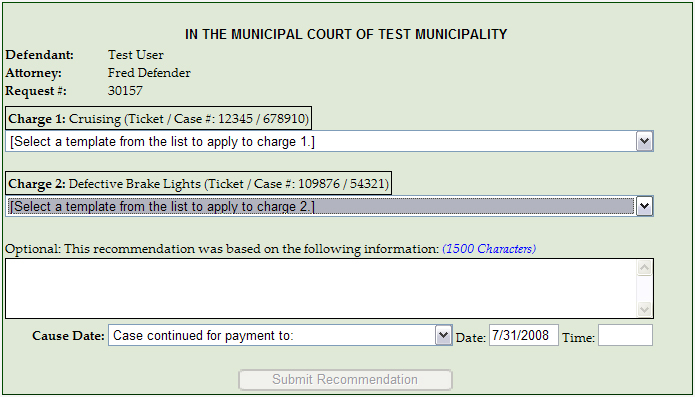
20.) Quick Rec [Back to table of Contents]
The "Quick Rec" option allows recommendations to be issued
very quickly by taking advantage of templates you have created for your
account. At least one template must exist to utilize this feature.
When creating a rec using the "Quick Rec" feature you simply
select a template to apply to each charge, fill in any optionional information,
select a cause date and click "Submit Recommendation" (see image below). With
this feature a recommendation can be created and submitted in a matter of
seconds!